Friday, September 12, 2014

Microsoft IIS Monitoring Through LoadRunner

This Web Server Resource monitor displays statistics about the resource usage on the Microsoft Internet Information Server (IIS) during the scenario run.

To obtain data for this graph, you need to configure the MS IIS online monitor (from the Controller) and select the measurements you want to display, before running the scenario. You select measurements for the Microsoft IIS Server monitor using the MS IIS dialog box.

Note: To monitor an IIS server through a firewall, use TCP, port .

  •  Adding a Machine to Monitor on page
  • Configuring the Microsoft IIS Monitor 
  • Microsoft IIS Performance Counters 
 
Adding a Machine to Monitor

In order to monitor the Microsoft_IIS server from the Controller, you need  to add the machine and the measurements you want to monitor.

To add a machine to the Controller:

1. Click the MS IIS graph in the graph tree, and drag it into the right pane of the Run view.

2. Right-click the graph and select Add Measurements, or click anywhere on  the graph and choose Monitors > Add Measurements. The MS IIS dialog box opens.In the Monitored Server Machines section, click Add. The Add Machine dialog box opens.

3. Enter the server name or IP address of the machine you want to monitor.

Select the platform on which the machine runs, and click OK.

4.In the Resource Measurements on: section of the MS-IIS dialog box, the default measurements are displayed.
  •  To delete a measurement from the default list, select the measurement and click Delete.
  • To select additional measurements, click Add. A dialog box opens displaying all the available measurements.
Note: To change the default counters for the Microsoft IIS Server monitor, see “Changing a Monitor’s Default Counters”.

5.Continue with Configuring the Microsoft IIS Monitor below.

Configuring the Microsoft IIS Monitor:

After you have added the machine that you are monitoring, you configure the monitor by choosing which objects to monitor on the machine.

1. When you click Add to add a measurement, the MS IIS dialog box opens displaying the Web Service object, its counters, and instances opens.
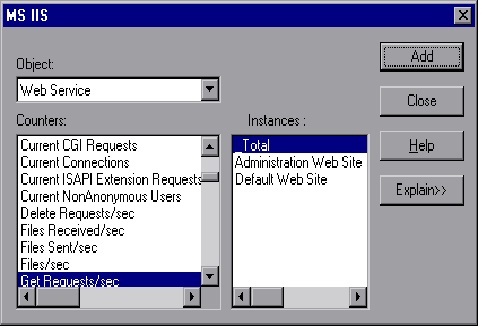


For each measurement, select an object, counter, and instance, and then  click Add, as described in “Understanding the MS IIS Dialog Box” on.

Note: To change the default counters for the Microsoft IIS Server monitor,  see “Changing a Monitor’s Default Counters”.

2. Add all the desired resources to the list, and click Close.
3. Click OK in the MS IIS dialog box to activate the monitor.

Understanding the MS IIS Dialog Box

The MS IIS dialog box lets you select the items to monitor on the MS IIS  server.
  •  Object: Select the object being monitored on the specified machine.
  •  Counters: Select a resource counter to monitor. Select multiple counters using the CTRL key. For an explanation of each counter, click Explain. 
  • Instances:If multiple instances of the selected counter are running, select one or more instances to monitor for the selected counter.

Creating a Basic Script from Server Traffic (Web-Services) in Load runner

While dealing with web-services based application(s), sometimes it is not possible to capture the user actions using Vugen. This might be due to application nature or something else. In this case there is an utility to create a basic LR script by using "analyze traffic" feature of web-services based script.

The actions needed for this are as follows:

1. Create a network capture file
2. Open a new web-services script in Vugen and import the WSDL.
3. Use the analyze traffic option to generate the script.

Create the capture file:

You can obtain a capture file using the command line utility or any existing
capture tool.
There is a utility in Vugen's bin directory called as "lrtcpdump.exe"which can be used to create the network traffic capture file.

To create a capture file on a Windows platform follow the steps

1.Choose Start > Run, type cmd and click OK to open a command window.
2. Drag in or enter the full path of the lrtcpdump.exe program located in the product’s bin directory.
3. Provide a file name for the capture file using the following syntax: lrtcpdump -f
4. lrtcpdump prompts you to select a network card. If there are multiple interface cards, it lists all of them. Type in the number of the interface card (1, 2, 3 etc.) and click Enter.
5. Perform typical actions within your application.
6.Return to the command window and click Enter to end the capture session.

Use the analyze traffice option to generate the script.

1.Choose File > New and click New Single Protocol Script in the left pane.
2.Select the Web Services protocol and click OK.
3.Click the Analyze Traffic button or choose Vuser > Analyze Traffic. The wizard opens.
4.Add the WSDL file location/URL and select next (optional)
5.On the next page provide the capture file information and click Finish

This will generate your basic web-services script for the action(s) performed. Then you can do your customization (parametrization and correlation) to the script.

Note: Please make sure that while making the capture file, all other TCP application(s) are closed. Only the application under test should be opened.

How to specify the number of iterations when executing a VuGen script from the command line

Use lr_get_attrib_string() to read the command line argument

VuGen has an -infiniteiterations option to specify the script to run infinite times. There is not currently a command line option available to specify the exact number of iterations.

1. In VuGen, select Run-Time Settings -> Additional attributes.
2. Create an argument name (for example, "iter"), and give a default argument value of 2.
3. Use a for loop in the Action item, and repeat the action "iter" number of times.

Example:

Action()
{
int iterations, i;
iterations = atoi(lr_get_attrib_string("iter"));

for (i = 1; i <= iterations; i++)
lr_output_message("This is a test, iteration is %s", lr_get_attrib_string("iter"));
return 0;
}

Note:
If you have any parameters declared in the script that are set to change values for each iteration, you may want to change them to each occurence so it takes a different value for each time it runs.

From the command line you can now run the script as

"LoadRunner install dir" \bin\mmdrv.exe -usr "path to .usr file" -out "path_to_output_directory" -iter "no_of_iters"

If Controller crashes in load runner ?


Here i am presenting you that what are the steps that we have to take when the controller crashes.

Make sure that you login as a local administrator

Login to the Controller machine with a local administrator account. Using domain account may cause unexpected behaviors.

Make sure that there are sufficient Disk Space
Make sure that you have enough disk space available on the controller and load generators. During scenario execution, the events are written onto the Load Generator machines and are saved locally until the scenario finished; where results are send back to the Controller. If the machine does not have enough disk space, it can cause problem.

Make Sure that the Temp directory is outside the User’s default Temp directory.

Make sure that there are sufficient memory available

To check available memory on a machine:
Right-click the status bar, and select Task Manager. Select the Performance tab to check the physical memory available. Select the Processes tab to check which processes have high memory consumption in the CPU column.

To free up memory: 

1.Close any unnecessary processes running on the machine, and try running the scenario again.
2.Restart your computer.
3.If the problem persists, reduce the number of virtual users that you are running on the same machine.

To enlarge the size of your virtual memory: 

1. Click Start -> Settings -> Control Panel -> System.
  • For Windows 2000, select the Advanced tab, and click Performance Options. 
  • For Windows NT, select the Performance tab. 
2. In the Virtual memory section, click Change. 

3. In the Drive list, click the drive that contains the paging file you want to change.
Under Paging file size for selected drive, type a new paging file size in megabytes in the Maximum size (MB) box, and then click Set.

To boost performance, and allow more Virtual Users to run on the load generator machine:
On Windows 2000 machines, select Start -> Settings -> Control Panel -> System -> Advanced -> Performance Options, and select the Background Services option.
On Windows NT machines, select Start -> Settings -> Control Panel -> System Properties > Application Performance. Set Performance boost to "None."
Check if the size of the output.mdb file in the results folder is more than 2 GB
If the output.mdb file becomes greater than 2GB during a load test, Controller is unable to write into it anymore and cause a crash.

Run the Controller’s batch files to register DLLs


Sometimes, DLLs can become unregistered or the registry can become corrupted to a point where a program's DLLs cannot be found. The purpose of batch files is to reregister them into the system's registry so that the programs can locate them. Use the following steps to do this:

 Shut down the Controller.
  1. Navigate to the \bin directory, and look for the following files:
  • register_controller.bat 
  • set_mon.bat
   3. Create a duplicate copy of the file, in the same location.
   4. Open up the duplicated file. In it, you should see several entries like the following:
 regsvr32 /s webbrwsr.dll
Remove the "/s" from each of these statements, but leave a space between the "regsvr32" and the DLL name.
  5. Save the changes.
  6. Double click on the batch file to run it. You should get several pop-up messages.

Try to recreate the Controller’s initialization file

Sometimes, the initialization files can become corrupted (e.g. after a crashed). You will have problem in launching or using the Controller after that. Use the following steps to do delete the initialization file so that a new copy will be created:
1. Shut the Controller.
2. Navigate to the C:\Winnt ( or C:\Windows for Windows XP machine )
3. Delete all files that begin with wlrun*. For example,
wlrun.ini, wlrun5.ini, wlrun7.dft, wlrun7.hst, wlrun7.ini

Check the temporary environment variables

Unlike the earlier window’s versions, Window 2000 and Window XP have the default environment set to c:\Document and Settings\\Local Settings\Temp instead of c:\Windows\temp. This long path with a space can cause several problems on LoadRunner. To resolve the issue, change to a directory without empty spaces

Reboot the system

When programs crash, they leave the system in an unstable state. This can cause many other problems that seem to have no apparent reason for happening or has not happened before. When the system is rebooted, it resets the system into a more stable state. This should be done after any program crashes.
Verify the information in the event viewer
Sometimes, if a program crashes, it does not give any clues for what had happened. By using the Windows event viewer, it may be possible to find some clue as to what happened when the crash occurred. The event viewer can be launched from Start -> Programs -> Administrative Tools -> Event Viewer.


Verify other programs are interfering with Controller


To find out whether hooked DLLs are possibly causing a problem, you can use a third party utility call "Process Explorer." This utility has the ability to view the DLLs loaded by an application. It can be downloaded free of charge from the following link:
http://technet.microsoft.com/en-us/sysinternals/bb896653.aspx

This can be used to see if LoadRunner loaded any other program's DLLs. 

Use the following steps to do this:

1. Unzip the .zip file, which was downloaded from the above URL, into a directory where you wish to install Process Explorer.
2. Start the Controller.
3. Run the Process Explorer (procexp.exe) from the directory into which you unzipped it (step a).
4. Select wlrun.exe (Controller) from the top section of Process Explorer.
5. The bottom section should be displaying a list of DLLs. If it is showing handles for the application, go to the "View" menu and select "DLLs."
6. Search through the list to see if any other program's DLLs are loaded. Normally, only DLLs from the \bin directory and standard Microsoft directories are loaded. For example, if you see wbhook32.dll (McAfee VirusScan hooking DLL) loaded by LoadRunner, then you would want to shut down the anti-virus software.


Disable the Anti-virus software what ever it present

It is known that anti-virus software is intrusive when they are set to look for viruses. However, in searching for viruses, the software can interfere with a program's proper execution. This could cause problems and sometimes crashes. This is why, for debugging purposes, it is recommended to turn off the anti-virus software.

Configuration/Troubleshooting the setup of Controller and Load Generator Machines - Part3


f.For Running Vuser Over Firewall:
  •  Check the check box for ‘Enable firewall’
  • Check the button for ‘Enable running Vuser over Firewall’
  • On the field for MI Listener, enter the IP address of the Controller that was configured in the Load Generator machine (step 1.(d) above).

g. Start LoadRunner agent on both ends (controller and load generator), using the commands in Step 1.(e) above.

h. Highlight the Agent and Click “Connect”.

Known problems and limitation:
You need to open up port 443 (bi-directional) for allowing incoming and outgoing communication on MI Listener machine.
You need to open up port 50500 between Controller and MI Listener, if the Controller and MI Listener machines are different.

Troubleshooting tips for connection issues between the MI Listener and the Agent machine
  • Make sure that you do not have any Web Servers, like IIS or Oracle HTTP servers running on both the machines. These servers uses/block port 443 and will cause a problem on launching LoadRunner agent.
  •  To verify that port 443 is open to allow communication between these machines, go to the agent (Load Generator) machine, launch DOS prompt and type in the command ‘telnet 443’ . For example,

telnet 128.11.147.150 443

If port 443 is open then you should see a connected telnet session window. If you do not see this, check with your Network admin/Firewall group to ensure that port 443 is open or not.

· The “Performance Center Agent Service” must be running either by ‘System User account’ or by a user who has administrative privileges on this machine (Username and password details need to be provided). These details can be found by right click on the service in Start -> Settings -> Control Panel -> Administrative Tools -> Services -> Performance Center Agent Service.

Additional tips:

· If you see the “Page can not be displayed” error in Performance Center web page(s), then login to Performance Center Web Server box and make sure that “Apache Tomcat” service is started (as shown below).


Question – The default user id named ‘admin’ was configured to login to Performance center Load test. It is not working now.

A.1 – The first step is to make sure that the user name and password is written correctly. The password is case-sensitive.

The default administrator account is Admin, Admin for the user and password.

A.2 – The second step perform in case that the first is not working, is the following:

• Open Documents And SettingsAll UsersApplication DataMicrosoftCryptoRSAMachineKeys and delete the entry that begins with f9416f003254e610da1f9bad8e4c383_.

• Restart IIS. Choose Start > Programs > Administrative Tools > Services. Select IIS Admin Service and click Restart Service.